Links to stuff on this blog

Use the Site Index of Projects page link above for an easier way to find stuff on my blog that you might be looking for!

Sunday, April 25, 2010

Time to make a flippin breakfast

This post might seem a bit odd and out of place for this blog but in the absence of anything else to write about this is all you get! Yesterday a was given the below pictured Single Egg Frying Pan (single egg omelet maker) and another single little frying pan as a gifts. The thing I really like about these is the eggs on the handles and the fact that the eggs have frowning faces! This makes total sense to me as I can't imagine an egg being happy about being fried. All I can say is bravo and three cheers to the makers of this little thing because I'm sure the temptation was to make the cute little eggs have happy smiling faces with bow ties or something similarly yucky.


After getting these I decided to look into the company that makes them. They are made or sold by a company called MSC International under the brand name Joli spelled like this: Jo!e. I looked them up on the web and it seems they make some rather brightly colored and somewhat disturbing kitchen items. For those interested HERE is a link to their catalog. Some of the more interesting things in there are the little Asian figure that is holding chop sticks on a Sushi serving tray, and the Pig, Penguin and Cow ice cream scoops. I don't know why those animals are appropriate for ice cream.
 
Anyway my son and I decided to give Easy Omelet frying pan a try this morning. It's the one pictured on the left in the above picture. It's actually two little frying pans connected together with a hinge opposite the handle. The two are locked together by a catch that is operated by the egg on the handle. You slide the egg away from his feet and the pans unlock, put in the egg material, close, lock and cook. When ready flip it over and cook the other side!! I'm stunned at this point...
  
So after deciding to make breakfast we had to go out and stock up on the required materials. I have absolutely nothing in my kitchen so this was a required trip. What we bought was the below pictured items:
  

When I opened the Omelet Easy frying pan I noticed that they had put a sticker right in the middle of the non-stick pan. I thought this was odd because you wouldn't expect a non-stick pan to have a sticker on it... and yes the sticker was stuck there and I had to scrape it off! So much for non-stick. Once we had taken the wrapper off and threw some eggs in there it all went pretty easy.


Above is an exciting live action shot of not only the egg pan in use but a partially eaten breakfast sandwich! Yum!

Sunday, April 18, 2010

Digital Clock with Finial

Two new things to talk about this time! 1) I finally mounted the 'egg shaped spiral' thing on top of the clock. 2) I now know what to call the 'egg shaped spiral' thing: finial. Thanks to Matt Mylar for pointing that out to me. I was sure that there was a name for those little things that sit on top of lamps, poles, rooftops, bedposts and in this case a clock and now I know!
  
Anyway I mounted the motor that I assembled last week into the top of the clock and put the finial on it's shaft. On top of that is the candle base and the fluted bowl. The entire assembly can be seen below.
  

Now that it is all together I'm not so sure that I like the proportions of the entire thing. It looks a bit tall for it's width and rather odd in some way that I can't quite put my finger on...
  
Anyway it is what it is at this point and having something that looks 'odd' in my house isn't a bad thing... in fact it will fit right in with the decor around here. There are still a few things left to do. I would like to add some lights or at least one light to the inside of the glass bowl and wire up the motor to make the finial turn. Right now the top of the clock is just sitting on top of the box for easy removal and modification. As is the bowl, it's not fastened to the red candle ring that is sitting under it. In looking at it I think that the red candle ring would look better if it were brass colored with black detail. I might change the color of it...
  
Also as I mentioned I need to wire up the motor and figure out some way to turn it off and on. I could build a power supply to run the motor so it's on all the time or make it turn when the as yet to be added lights are put in place.
  
The nice thing about it not being done is there is more to do for next week!

Sunday, April 11, 2010

Clock Movement with Pendulum Egg Looking Thing (Tamiya Gearbox)

I have made a little progress on the Steampunk looking digital alarm clock that I have been working on. This week (with what little time I have) I have focused on the clock movement. From the pictures in the last posts about this clock you can see the egg shaped spiral and the glass vase that I have been thinking about mounting on top of the clock. HERE is a picture of what I am talking about... This is going to sit on top of the clock and turn around providing some movement while the clock is keeping time. At one point I was considering not only having the egg spin inside the glass but change direction as well. So have it go one direction speeding up as it goes them slowly slow down to a stop and change direction going back the other way. Kind of like a pendulum in a real mechanical clock. To do that would have been a bit tricky and I decided that just having it turn is good enough.
  
To get it to spin I need of course a motor and some way to slow the motor down. The easiest way is with a gearbox on a motor. I have lots of gears around that I have taken out of various things like laser printers, clocks and other devices but to piece them all together would have been too big of a project. What I decided to do was buy a Tamiya Gearbox that you can get from a good hobby store. I have never used a Tamiya product so this is my first time messing with one. Tamiya makes all kinds of model cars and planes as well as educational robotic stuff. They have a line of just plain gearboxes for building your own stuff as well. Anyway here is the kit I got for a little over $10.00:
  

They call it the Tamiya Worm Gear Box H.E. (H.E. for High Efficiency). This comes with all the parts you need to put the gearbox together and some cool extra parts for attaching it to other stuff. They even include grease for the gears and an allen wrench for the set screws that they give you. You can get a couple of different gear ratios depending on how you put it together; 216:1 or 336:1. After putting it together the only negative comment I have about it is it is missing a shaft spacer for the output shaft. Without this spacer the last gear in the gear train can move on the output shaft and rub against the gear that is driving it. Maybe I put it together wrong or was missing a part but overall it is a cool little gearbox for a very good price.
  
Once I had the gearbox together I cut the threaded end off the egg shaped thing I have and drilled a hole in the center of the remaining shaft. Drilling a hole in the center of a shaft isn't all that easy but I managed to get it darn close to the center. I added some split toothpick wood strips as shims to get the egg right on center and will epoxy it once I'm happy with it.
  
  
I built the gearbox with the slowest ratio 336:1 and running on a 1.5 volt battery it turns a little faster than I like but it will be OK. The other thing that I decided to do was add a 'beauty ring' to the bottom of the glass bowl. This is one of those cast aluminum rings that you can get at the craft store that are intended for candles... I guess you put the ring at the base of the candle to make the base of the candle 'look beautiful'. I'm not so sure about that but I think it looks good at the base of the bowl. I'll probably paint it a different color before I mount it on the top of the box.
  
The last thing that I did was pick up an LED night light and take it apart. Inside there is a little PC board that has a light sensor and a high output LED soldered to it on long leads. I can extend the leads so the sensor pokes out a hole in the wood clock box and the LED points up into the glass bowl someplace near the base of the egg once it's installed in the bowl. I'm thinking about maybe getting some different colored pieces of plastic and attaching them to the gearbox along with the egg. That way as the egg turns inside the glass the LED will shine through the different colored plastic and change the color of the egg and bowl. I'll have to see how convenient that is as I get the top of the box constructed.
 

Sunday, April 4, 2010

Clock Hack Update (looks kinda Steampunk (a little...))

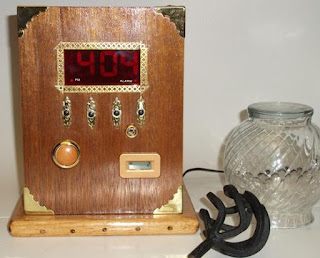
I have made some more progress on the digital alarm clock repackaging hack that I wrote about in the previous couple of posts. I am going for an antique look with the digital clock in there which reminds me a bit of the Steampunk stuff that I have seen, kind of a mix of old technology and new stuff. I'm not sure if it's going to end up looking like it's steam powered but then again a lot of the Steampunk stuff doesn't look steam powered to me. Anyway I have made some progress and here is a picture of how it looks now:
  
 
If you compare the above picture with how it looked last week (HERE) you can see some interesting differences. One is I have stained and varnished the box with polyurethane wood stain and varnish. Also I have added some brass 'adornments' to the face of the box. Under the clock face there are 4 buttons that are for setting the clock time and the alarm time. The two middle buttons are the up/down time set and the other two for the time and the alarm. To the left is a cabinet knob that is attached to a spring loaded pull mechanism that I made and it acts as the snooze button when you pull it. There is also a small switch to the right that turns the alarm on and off right above the 'hour meter' that keeps track of the elapsed time that the clock has been plugged in. I'm not sure the value of the elapsed time meter but it looks neat. Around the clock face is some brass 'hatching' that is used in model railroad building for bridges etc...
  
The other two items on the right are the glass spiral bowl and the egg shaped spiral thing that I mentioned I found some time ago. These two items are going to go on the as yet to be constructed top of the box that I am planning on making. I want the glass bowl to sit upside down on top of the box with the egg shaped thing spinning inside. To do this I need to find a motor and a gearbox that will spin the egg slowly around... I think that will look a lot better and more interesting than just a plain flat top.
  
The last item that I want to add is a light source to shine into the glass bowl and the spiral egg thing. What I am going to do for that is take a cheap LED night light that has a light sensor and put it inside with the light shining up into the bowl. If it is easy I'll use the light sensor to also turn the egg motor on and off when it gets dark. Anyway that is the plan right now... I may change that all around later.
  
 
Above is a picture of the cabinet knob putt switch that I made up. The knob is on the right and one of those little lever arm micro-switch's is on the left with it's mounting screws hot glued nice and tight. When you pull the knob it actuates the switch and the snooze timer starts. Last but not least in the above picture you can see one of those 'decorative catches' you can get at the hardware store. They are used as snap locks on small boxes, but in this case I drilled a hole in the catch (on the left) and used it as a washer for the push buttons... I did this for each button. That gives the buttons a nice old fashioned look... and now I have 4 latches that are missing catches.
  
That sums up the progress on the clock.